Summer

How to preserve herbs

Culinary herbs are a key ingredient in many foods, but with fall rapidly approaching, it's time to start thinking about preserving your fresh garden herbs. The best way to save the taste of herbs from your garden is to preserve them before winter. While some herbal plants, such as parsley, will survive many months indoors in pots if brought in before a frost, most herbs are better frozen or dried to use in the months ahead. Dried and frozen herbs are easy to store and take up less room than a fresh herb plant. In fact, 10 pounds of fresh herbs equals about 1 pound of dried herbs. You can also process your herbs by making pesto or herb vinegars, to preserve their flavors.

Here are some tips on the best ways to preserve your herbs.

Harvest your summer herbs to savor their flavor all winter.

Harvest your summer herbs to savor their flavor all winter.

Harvesting herbs

Herbs are best harvested before flower buds form and in the morning before the sun has evaporated the essential oils in the leaves. This late in the year many herb plants may have started to flower. To create higher quality leaves for storing, snip the flower buds to encourage new side shoots to grow. A few weeks later these leafy side shoots will be good candidates for harvesting and preserving. When harvesting branches of herbs, snip just above a leaf to encourage more growth during the waning days of fall. Always select stems that have little damage from disease and insects.

Quick drying herbs

Herbs for drying can be grouped into two categories; quick drying herbs and slow drying herbs. Quick drying herbs include lavender, marjoram, mint, oregano, rosemary, and sage. These herbs are best bundled together in bunches of 10 to 12 stems, tied with rubber bands and hung upside down in an airy, cool room out of direct sunlight to keep the essential oils in the leaves from volatilizing. The bundles of herbs will dry in about 1 to 2 weeks, depending on the weather. Humid weather slows the drying process. Once dry, strip the leaves off the stems and store. Dried herbs are best stored in a dark place and used within three months of storage for best flavor.

For the best results, know the difference between slow and quick drying herbs.

For the best results, know the difference between slow and quick drying herbs.

Slow drying herbs

These herbs don't dry well in bunches and are best if separated from their stalks and dried on screens. Herbs such as basil, dill leaves, lovage, parsley, and thyme fall into this category. Remove the leaves, cut them into small pieces, and lay them on screens for air drying or place on a cookie sheet to dry in the oven or a dehydrator. Set the oven or dehydrator to a low temperature (below 150°F), and stir often until the leaves are dry. Store in glass jars.

Freezing herbs

Herbs with high water content, such as basil, lovage, mint, lemon balm, and tarragon can also be frozen. Freezing preserves herbs in a bright green state and makes them available for adding to soups and stews in winter. Wash herb stems and remove the leaves. Pat the leaves dry and place on a cookie sheet or tray, separating them so they don't freeze together in a solid mass. Cover and place in the freezer until frozen. Store in an airtight container or freezer bags for up to one year.

Another handy way to freeze herbs is in ice cube trays. This is a great way to preserve combinations of herbs you use in special soups and stews in winter. Stuff three or four individual leaves or chopped herbs in a ice cube tray and fill with broth or water. Freeze, then remove the blocks and store in freezer bags. 

Pestos & vinegars

I love eating pesto in summer and preserving pesto for winter, too. I use the ice cube tray method making batches of pesto by filling the trays and storing the cubes in freezer bags. Don't feel limited to basil pesto either. The word pesto, in Italian, means to pound or crush, so try out different leaf combinations like spinach and parsleyarugula and parsley or kale and sun-dried tomatoes. Vinegars are a great way to preserve herbs such as basil, oregano, thyme, and rosemary. Use three to four sprigs of herbs per one cup of vinegar. Experiment with white vinegar, cider vinegar and wine vinegar, using different herbal combinations and amounts.

Collecting herb seeds

Some herb plants are best preserved by collecting the seeds. Dill, fennel, and coriander are some of the most popular herbs whose seeds are used in cooking. To collect herb seeds, let the plants flower and form seed heads. When the seed head begins to yellow and dry, but before the seeds start dropping, harvest the head and cover it with a brown paper bag, securing the bottom with an elastic band. Hang it upside down indoors. Wait a week or so to let the herb seeds mature and dry. Periodically shake the bag to dislodge the seeds into the bag. Store seeds in a glass jar in a dark location. Use within six months for best flavor.

Kale-Walnut Pesto with Sun-Dried Tomatoes

No need to wait until summer's basil bounty to make pesto—you can enjoy a flavorful kale pesto any time of the year. Valued as much for its taste and texture as its nutrients, this kale pesto is simple and robust and is delicious tossed with pasta or as a sauce for pizza or a crostini. This is also an excellent use for extra kale from the garden or CSA share—and it freezes well to boot.

Kale Pesto Bow Tie Pasta

Ingredients

  • 1 large bunch kale (about 6 cups of leaves)
  • 5 sun-dried tomatoes (not packed in oil)
  • 1 clove garlic, chopped
  • 1/4 cup grated Parmesan
  • 1/4 cup walnuts, toasted
  • 1 tablespoon lemon juice
  • 1/2 cup olive oil
  • Salt to taste

Preparation

  1. Place sun-dried tomatoes in a small dish and add boiling water, just to cover. Set aside while they soften.
  2. Strip the kale greens from the thicker ribs. Bring a large pot of salted water to a gentle boil. Add the kale to the water and blanch for 30 seconds or less. Remove the greens immediately and place in an ice bath.
  3. Remove kale from the ice bath, squeeze to remove the water then place it in a food processor. Chop the sun-dried tomatoes and add those, along with the garlic, Parmesan, walnuts, lemon juice and a pinch of salt, to the food processor.
  4. With the food processor running, drizzle in the olive oil, scraping down the sides as needed. Adjust the salt to taste.

Serving Suggestion

Toss with pasta and top with additional Parmesan and toasted walnuts, if desired, or use as a sauce for pizza or crostini.


Reprinted by permission from StrongerTogether.coop. Find articles about your food and where it comes from, recipes and a whole lot more at www.strongertogether.coop.

Raspberry Agave Sorbet

Sorbet is a refreshing and light alternative to ice cream. Try it layered in parfaits, floated in berry sangria, or on top of another berry desserts, such as cobbler. In this version, using agave syrup means that you can skip the traditional step of making a syrup from sugar, since agave dissolves in cold water.

Raspberry Sorbet

Ingredients

  • 12 ounces frozen or fresh raspberries
  • 1/2 cup light agave syrup
  • 1/2 cup water
  • 1/2 teaspoon vanilla

Equipment

  • Ice cream maker or food processor

Preparation

  1. If using an ice cream maker, have it chilled and ready to go (if using the freezer method, have an ice cube tray or cookie tin lined with parchment paper ready to go). Place a fine wire screen strainer over a bowl, which you'll use to strain the raspberry puree.
  2. In a food processor or blender, puree the raspberries until smooth. Use a rubber spatula to scrape the puree into the wire strainer, and then to press the puree through. Scrape and move the fruit pulp until all you have left are seeds. You should have about one cup of puree. Stir in the agave, water and vanilla, then chill until very cold.
  3. Use the ice cream maker to freeze the sorbet. If desired, transfer to a storage tub and freeze until ready to use. (If using the freezer method, pour the sorbet mixture into the ice cube trays or onto the parchment lined cookie tray and freeze. Break the frozen sorbet mixture into chunks, if using a cookie tray, and puree the chunks in a food processor before serving.)


Photo via Creative Commons. 

Authored by Robin Asbell. Reprinted by permission from StrongerTogether.coop. Find articles about your food and where it comes from, recipes and a whole lot more at www.strongertogether.coop.

DIY Quick Pickles

Pickling can be just that—a pickle. True pickling is an ancient miracle for food preservation, but involves a drawn-out fermentation process requiring canning equipment, sterilization procedures and a whole lotta waiting around.

But, did you know that there’s a fast and easy way to preserve and chill your fresh garden veggies? Follow these quick pickling steps for those of you not ready to go all in. 

DIY Quick Pickle

1. Pick your pickle

Although cucumbers are the most common for pickling, you can pickle almost any vegetable such as baby carrots (not the bitty mature carrots which you find in packages, but miniature immature ones with the skin still on), shallots, onion, asparagus, cauliflower, green beans, zucchini, okra, and beyond. The fresher and crispier the produce, the better the final product.

2. Prep the potion

The main ingredient in pickle brine is vinegar. White vinegar is most common, but you can also use cider vinegar or wine vinegar. Balsamic is not recommended as it’s too syrupy. Combine 1 cup vinegar with 1/2 cup water in a saucepan. Instead of diluting the vinegar with water, try including a 1/2 cup of white or brown sugar with a dash of cinnamon.

Add a few pinches of salt. Salt draws moisture out of the vegetables and encourages the growth of useful bacteria. 

5. Spice it up 

This is where it gets fun. Many "pickling spice" blends are available and work beautifully, but consider a visit to the bulk aisle at your local food co-op to customize your blend. Mustard seed, dill seed, dry coriander seed, red pepper flakes, bay leaf, black peppercorns and garlic are all great places to start.

Combine all the ingredients in the saucepan, stir to dissolve, and bring to a boil.

3. Prep your veggies

Trim off any inedible pieces of your vegetable (e.g., the ends of green beans or root ends of onions). If you're cutting your vegetables into pieces, make sure they're all about the same size for pickling consistency.

Leeks and carrots make great pickled veggies.

Leeks and carrots make great pickled veggies.

4. Submerge and chill

Place your vegetables in a clean, dry container. Glass jars are the best because they won’t absorb any odors from the pickles.

Pour the boiling brine into the jar and submerge the veggies completely (you can add water to bring up the level if needed). Refrigerate for at least one hour and let the brine work its charms. The longer you brine, the tastier the pickle.

Depending on your veggie, quick pickles will keep in the fridge for weeks to a few months. 


Reprinted by permission from StrongerTogether.coop. Find articles about your food and where it comes from, recipes and a whole lot more at www.strongertogether.coop.
 

Avocado Ice Cream

This is ice cream is a creamy and refreshing dairy-free dessert.

Avocado ice cream makes a great creamy ice cream texture.

Avocado ice cream makes a great creamy ice cream texture.

Ingredients

  • 1 1/2 cups avocado puree, (see tip), from about 3 ripe large avocados
  • 1 1/2 cups water
  • 1 1/3 cups sugar
  • 1/4 cup lime juice
  • 1/3 cup tequila
  • Lime zest, for garnish

Preparation

  1. After making avocado puree, add water, sugar, lime juice and tequila to the food processor with 1 1/2 cups of the puree; pulse until well combined. Refrigerate the mixture for 1 hour or overnight.
  2. Transfer the avocado mixture to the canister of an ice cream maker. Freeze according to manufacturer’s directions. If desired, place the ice cream in the freezer to firm up before serving. Garnish with lime zest, if desired.

Tips & Notes

To make avocado puree, peel and pit 3 ripe large avocados and process in a food processor until smooth. Measure out 1 1/2 cups for the ice cream. Reserve any extra for another use.


Photo via Creative Commons. Authored by eatingwell.com. Reprinted by permission from StrongerTogether.coop. Find articles about your food and where it comes from, recipes and a whole lot more at www.strongertogether.coop

Bean Burgers with Spicy Guacamole

Crunchy cornmeal on the outside and Southwestern flavors on the inside, these bean burgers please all kinds of eaters.

Make burgers one day in advance to save time.

Make burgers one day in advance to save time.

Ingredients

Burgers

  • 1/2 cup water
  • 1/4 cup quinoa, rinsed (see Note)
  • 3 tablespoons extra-virgin olive oil, divided
  • 1/2 cup chopped red onion
  • 1 clove garlic, minced
  • 2 1/2 cups cooked pinto beans, well drained
  • 1 teaspoon smoked paprika
  • 1/2 teaspoon ground toasted cumin seeds (see Tip)
  • 3 tablespoons chopped fresh cilantro
  • 3 tablespoons cornmeal, plus 1/3 cup for coating burgers
  • 1/2 teaspoon salt
  • Freshly ground pepper to taste
  • 6 whole-wheat hamburger buns, toasted
  • 6 lettuce leaves

Guacamole

  • 1 ripe avocado
  • 2 tablespoons finely chopped fresh cilantro
  • 1 tablespoon lemon juice
  • 2 teaspoons finely chopped red onion
  • 1 clove garlic, minced
  • 1/8 teaspoon cayenne pepper, or more to taste

Preparation

  1. Bring water to a boil in a small saucepan. Add quinoa and return to a boil. Reduce to a low simmer, cover and cook until the water has been absorbed, about 10 minutes. Uncover and let stand.
  2. Heat 1 tablespoon oil in a medium skillet over medium heat. Add 1/2 cup onion and garlic and cook, stirring occasionally, until soft and fragrant, about 3 minutes. Add beans, paprika and ground cumin and mash the beans to a smooth paste with a potato masher or fork. Transfer the mixture to a bowl and let cool slightly. Add the quinoa, 3 tablespoons cilantro, 3 tablespoons cornmeal, 1/2 teaspoon salt and pepper; stir to combine.
  3. Form the bean mash into 6 patties. Coat them evenly with the remaining 1/3 cup cornmeal and transfer to a baking sheet. Refrigerate for 20 minutes.
  4. To prepare guacamole: Mash avocado with a potato masher or fork. Stir in 2 tablespoons cilantro, lemon juice, 2 teaspoons onion, garlic, cayenne and 1/8 teaspoon salt.
  5. Preheat oven to 200°F.
  6. Heat 1 tablespoon oil in a large cast-iron (or similar heavy) skillet over medium-high heat. Reduce heat to medium and cook 3 burgers until heated through and brown and crisp on both sides, 2 to 4 minutes per side. Transfer to the oven to keep warm. Cook the remaining 3 burgers with the remaining 1 tablespoon oil, reducing the heat as necessary to prevent over-browning. Serve the burgers on buns with lettuce, tomato and the guacamole.

Tips & Notes

  • Toast cumin seeds in a small skillet over medium heat, stirring occasionally, until very fragrant, 2 to 5 minutes. Let cool. Grind into a powder in a spice mill or blender.
  • Quinoa is a delicately flavored, protein-rich grain. Rinsing removes any residue of saponin, quinoa's natural, bitter protective covering.


Authored by Eatingwell.com. Reprinted by permission from StrongerTogether.coop. Find articles about your food and where it comes from, recipes and a whole lot more at www.strongertogether.coop

Mixed Berry Crumble

This crumble is very versatile. Choose your filling based on the current season's fresh fruits.  

Ingredients

  • 1 cup rolled oats
  • 3/4 cup light brown sugar
  • 3/4 cup whole wheat pastry flour
  • 1/2 teaspoon salt
  • 2 teaspoons lemon zest
  • 1/2 cup unsalted butter, melted
  • 4 cups fresh strawberries, stems removed
  • 2 cups fresh raspberries
  • 1 cup fresh blueberries
  • 2 tablespoons sugar
  • 1 tablespoon arrowroot or cornstarch
  • 1 teaspoon vanilla

Preparation

Heat the oven to 400°F. In a large bowl, combine the oats, brown sugar, flour, salt and zest. Add the melted butter and stir to mix. Reserve. Place the berries in a 2-quart baking dish, and sprinkle with sugar, arrowroot or cornstarch, and vanilla. Toss gently to coat, until well combined. Crumble the oat mixture over the berries in the dish. Bake for 25 minutes, or until the topping is golden and the juices are thick and bubbly all the way around the dish. Let cool on a rack for 5 minutes before serving.

Serving Suggestion

Vary the flavors by adding a teaspoon of cinnamon to the topping, or change the balance of berries in the mix. Substitute a gluten-free flour blend if you prefer. Serve this warm with a scoop of ice cream and you can't miss.


Authored by Robin Asbell. Reprinted by permission from StrongerTogether.coop. Find articles about your food and where it comes from, recipes and a whole lot more at www.strongertogether.coop

Watermelon-Strawberry Lime Cooler

Cool off with a great pink smoothie combo. Watermelon and frozen strawberries make a wonderful slushy drink. A touch of lime and a sprig of mint give it a refreshing twist.

Watermelon Lime Cooler

Ingredients

  • 1 cup frozen strawberries
  • 4 cups cubed watermelon, seeds removed
  • 2 tablespoons fresh lime juice
  • Mint sprigs

Preparation

In a blender, combine the watermelon and strawberries. Add the lime juice and puree. Serve immediately with mint sprigs for garnish.


Authored by Robin Asbell. Reprinted by permission from StrongerTogether.coop. Find articles about your food and where it comes from, recipes and a whole lot more at www.strongertogether.coop

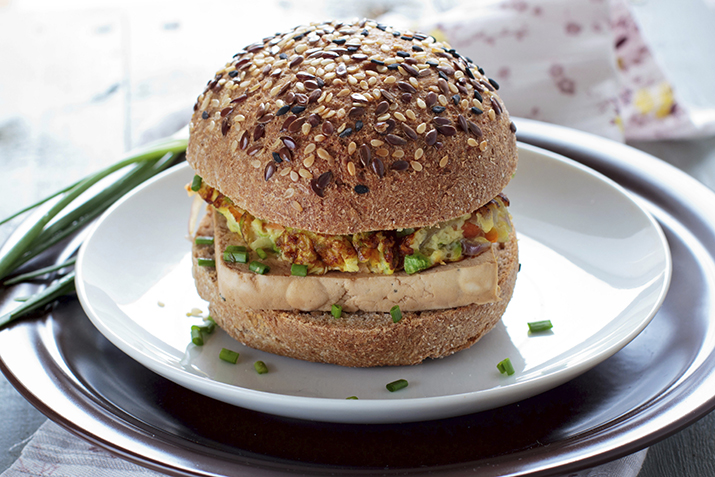
Smoked Tofu Burgers

Tofu is like a sponge, soaking up smoke and getting firmer and denser as it sits on the grill. Just keep it on the cool side of the grill and give it plenty of time to get nice and smoky. 

Double the tofu and marinade and grill up an extra batch of tofu to use in sandwiches, salads, and soups for the week.

Tofu Burger

Ingredients

  • 2 tablespoons tamari soy sauce
  • 2 tablespoons cup vegetable oil
  • 1 tablespoons red wine vinegar
  • 1/4 teaspoon smoked paprika
  • 1 block (1-pound)  extra firm tofu
  • 5 whole wheat hamburger buns
  • 5 large lettuce leaves, shredded
  • 1 large tomato, sliced
  • 2 scallions, chopped
  • Ketchup, mustard, barbecue sauce, if desired

Materials

  • 4 cups woodchips, soaked in water
  • 1 spray bottle filled with water
  • Smoker box or foil to make a pouch

Preparation

  1. Mix soy sauce, vegetable oil, wine vinegar and paprika in a square container with a liquid-tight lid large enough to hold all of the tofu. Drain water from tofu and wrap in clean towels, press carefully to soak up water without breaking the tofu. Unwrap tofu and slice into 5 thick slices per block. Place the slices in the marinade, put the lid on the container and turn it over to coat the tofu. Refrigerate the marinating tofu for at least 24 hours or up to three days, turning occasionally to coat.
  2. Prepare the grill for smoking (see Tips & Notes for instructions).
  3. When the grill is ready and the cool side of the grate is oiled, place the tofu on the grate. Close the lid, opening it once every 10 minutes to quickly turn the tofu. Smoke tofu for 40 minutes.
  4. Serve on buns with lettuce, tomato, and condiments of choice.

Tips & Notes

1. Create hot and cool zones

For best smoking results, create hot and cool zones on the grill. The hot zone is where the smoke is created and the food may be seared. The cool zone is where the food is placed to allow the food to cook more slowly and absorb the smoky flavor. If your grill is too small to create both a hot and a cool zone, check your food for doneness earlier as it will cook faster over the high heat

2. Prepare your grill for smoking

Heat the grill

Gas grills: Remove the grate, then turn the gas on high. If your grill has more than one burner, use a single burner on one side. Once the grill is hot, place the smoker box filled with soaked woodchips, or a foil pouch filled with the same, on the hot side of the grill. Replace the grate.

Charcoal grills: remove the grate, pile the charcoal to one side and light it. Heat until it is hot and covered with white ash. Place the smoker box filled with soaked woodchips, or a foil pouch filled with the same, directly on the coals and replace the grate.

Get the woodchips smoking

Allow the woodchips to start smoking. Once you smell the smoke and see wisps of it, you are ready to smoke your food.

3. Smoke your food

Pour a couple tablespoons oil into a cup. Dip a clean paper towel into the oil, hold it with tongs and quickly oil the cool side of the grate (if there are no hot and cool zones on your grill, oil wherever you plan to place the food). Place the food on the oiled grate and quickly cover the grill to allow the food to cook and absorb the smoky flavor.

4. Keep the flames in check

Have a spray bottle of water ready to douse out any flare-ups.


Authored by Robin Asbell. Reprinted by permission from StrongerTogether.coop. Find articles about your food and where it comes from, recipes and a whole lot more at www.strongertogether.coop

Grilled Romaine Salad

Use the grill for more than just meat this summer by grilling your salad, too. Romaine is hearty and lends itself perfectly to grilling.

Pile on veggies of your choice for a complete grilled romaine salad. 

Pile on veggies of your choice for a complete grilled romaine salad. 

Ingredients

Salad

  • 1 large head romaine lettuce
  • 1 ear corn
  • 2 slices day-old bread
  • 1/2 avocado, chopped
  • 1/4 medium red onion, thinly sliced
  • 2 tablespoons extra virgin olive oil, divided

Dressing

  • 1/4 cup freshly grated Parmesan cheese
  • 1 tablespoons lemon juice
  • 2 tablespoons extra virgin olive oil
  • 1 tablespoon balsamic vinegar
  • 1/4 teaspoon freshly ground black pepper

Preparation

  1. Make the dressing by whisking together the cheese and lemon juice in a small bowl. Add the olive oil, balsamic and black pepper and whisk again until incorporated. Set aside.
  2. Preheat an outdoor grill or stove top grill pan to medium-low, about 350⁰F.
  3. Place the corn on the grill and grill for about 4-5 minutes per side until the kernels start to char. Remove from grill once the whole ear is slightly charred, cut the kernels off the cob and set aside.
  4. While the corn grills, drizzle the bread with 1 tablespoon of olive oil and place on the grill for about 1-2 minutes per side until just slightly toasted and grill marks appear. Remove from the grill and cut into cubes.
  5. Cut the head of romaine in half lengthwise keeping the core intact. Wash each half thoroughly, gently shake off any excess water and dry well.
  6. Drizzle both halves of romaine (cut side) with the remaining tablespoon of olive oil. Place the lettuce halves on the grill, cut side down and grill for 1-2 minutes per side until the outer leaves just start to wilt and the core has some nice grill marks.
  7. Plate the grilled romaine on a serving platter, top with the grilled corn kernels, sliced red onion, chopped avocado and grilled croutons.
  8. Drizzle the dressing on top and serve warm.

Serving Suggestion

Add chopped hard-boiled egg or cooked chicken for a complete meal.