Summer

LA Inspired Street Food: Fruit Salad

Rainbow Umbrella Fruit Cart

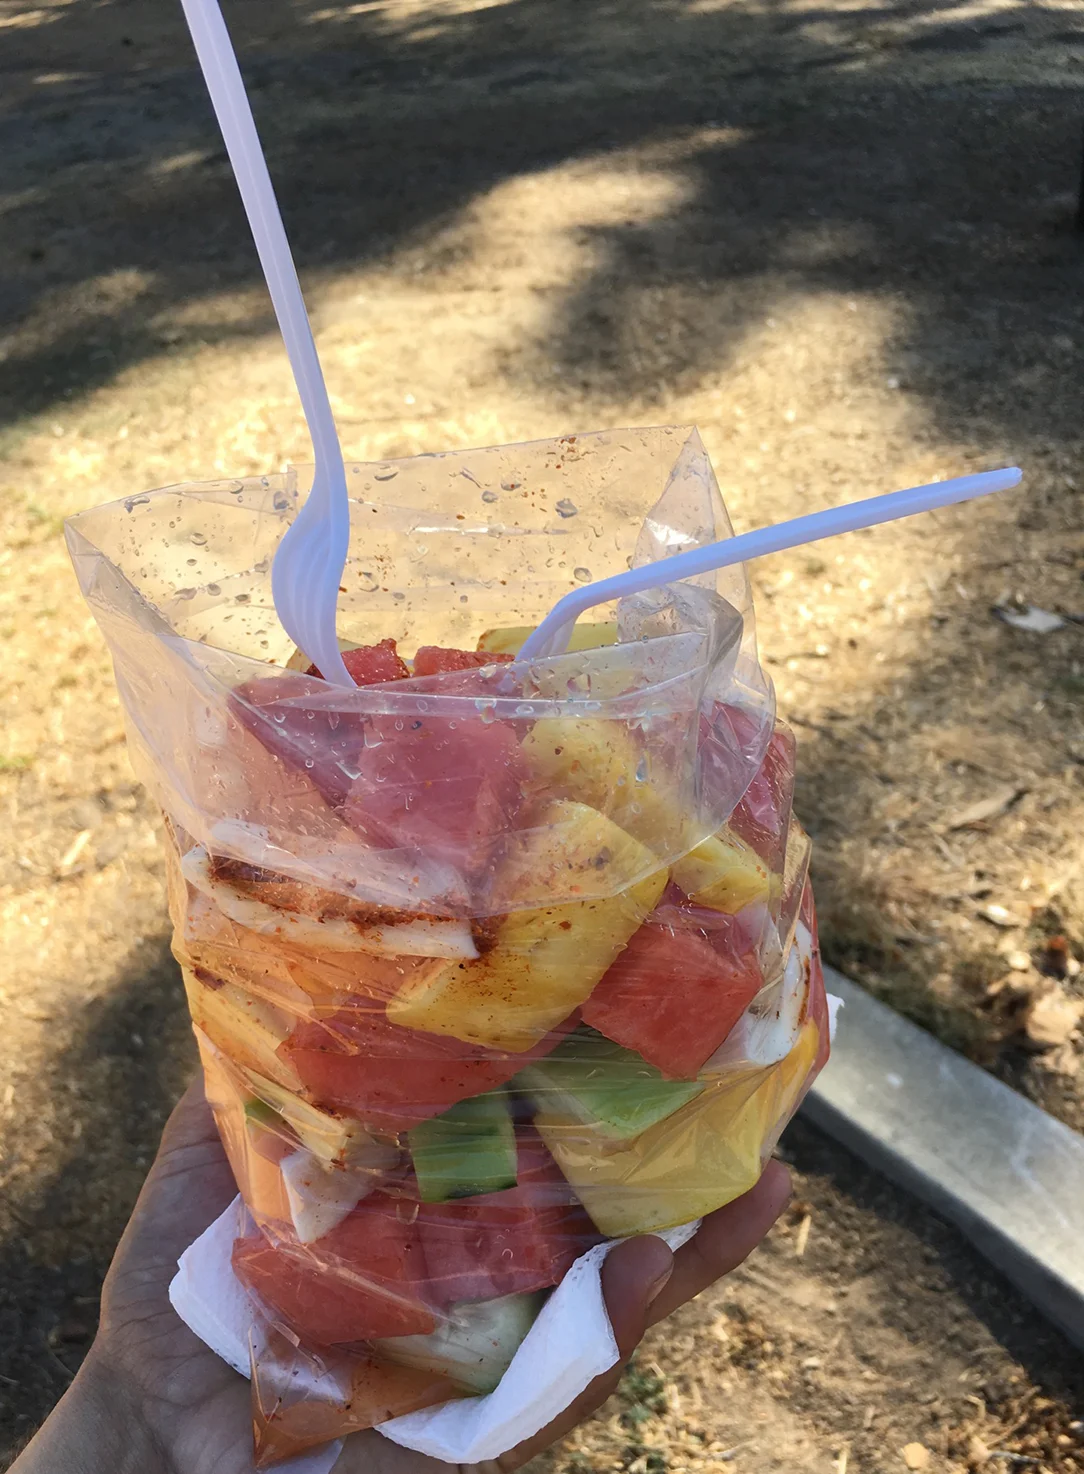
If you’ve been to Los Angeles, you may be familiar with the fruit carts sprinkled throughout the city’s many neighborhoods. Carts are typically situated on street corners topped with a rainbow umbrella. Once you spot one, they’re hard to miss.

No matter where you are in the city, vendors stock their carts with the same tools and ingredients - a cutting board, a sharp knife, Ziploc bags, and a bounty of fresh fruits on ice. The secret to this fruit salad is the seasoning. Tajín, a spicy Mexican salt, combines with fresh lime juice for an extra kick and refreshing treat.

LA fruit vendors load up a ziploc bag to be enjoyed on-the-go.

LA fruit vendors load up a ziploc bag to be enjoyed on-the-go.

Like any fruit salad, this recipe is very forgiving and can be completely tailored to your tastes. LA fruit carts traditionally use tropical fruits, like mango, melons, and pineapple, but feel free to substitute as you please.

Ingredients

  • 1 small watermelon
  • 1 cantaloupe
  • 1 jicama
  • 1 pineapple
  • 1 cucumber, peeled and seeded
  • 2 mangos
  • 1 papaya
  • Healthy dash of Tajín or chili powder
  • Juice of 1 lime

Preparation

Chop fruits into bite sized pieces. Toss fruits with lime juice and Tajín salt or chili powder. Add an extra dash of Tajín if you can handle the heat.

Serving Suggestion

Serve in a bowl at your upcoming summer bbq. Throw the salad in a Ziploc bag and enjoy on-the-go like a native Angeleno.

Garnet Yam Burgers

Sweet potatoes, chickpeas, millet and spices team up for a fabulous burger.

Garnet yam burger

Garnet yam burger

Ingredients

  • 1 1/2 cups vegetable broth
  • 1 cup peeled and diced garnet yams or sweet potatoes
  • 1/4 cup diced yellow onion
  • 2 cloves garlic, minced
  • 1/2 cup canned chickpeas, rinsed, drained and smashed
  • 1/2 cup millet
  • 1 teaspoon cumin
  • 1 1/2 teaspoons chili powder
  • 2 teaspoons vegetarian Worcestershire
  • Salt
  • 1 cup bread crumbs, divided
  • 1 egg, beaten
  • 1 to 2 tablespoons vegetable oil

Preparation

  1. Bring the vegetable broth to a boil in a medium soup pot. Add the yams and simmer for about 8 minutes, just until the yams are getting tender. Add the onion, garlic, chickpeas and millet, cover the pot and simmer for another 20 minutes, stirring occasionally. The millet should be tender and the liquid should be entirely absorbed when done.
  2. Remove from heat and stir in the cumin, chili powder, Worcestershire, a pinch of salt and half of the bread crumbs. Stir well and form into 6 even burgers.
  3. Put the beaten egg in a small dish and the remaining bread crumbs in another small dish or plate. Gently dip each burger in the egg, and then coat well in bread crumbs. Place the burgers on a sheet pan or plate and refrigerate for about 30 minutes.
  4. Heat the vegetable oil over medium-high heat in a large skillet. Add the yam burgers to the pan and cook for 4 to 5 minutes until browned well on one side. Gently flip the burgers and cook another 4 to 5 minutes.

Serving Suggestion

Serve on a toasted whole-wheat bun with Sriracha mayonnaise, sliced pickled jalapeños and crispy lettuce, or sweet pickles, ketchup and mustard if you prefer. Or make this a main course option for vegetarian holiday guests!


Reprinted with permission from StrongerTogether.coop. Find articles about your food and where it comes from, recipes and a whole lot more at www.strongertogether.coop. Photo provided by Wholehearted Eats.

Pineapple Green Smoothie

Pineapple Smoothie

Ingredients

  • 1/2 cup milk
  • 1/2 cup plain Greek yogurt
  • 4 cups spinach leaves, washed
  • 1 cup pineapple chunks, drained
  • 1 medium frozen banana, sliced

Preparation

Place ingredients in a blender in the following order: milk, yogurt, spinach, pineapple and banana, and secure the lid. Blend on high until smooth. Pour into glasses and serve immediately.

Serving Suggestion

For a thicker smoothie, use frozen pineapple chunks as well as the sliced, frozen banana. Make your own frozen fruit for smoothies by cutting up fresh pineapple and bananas and freezing the pieces on a baking sheet; then transfer to a zip-close bag for storage. Drained canned pineapple freezes just as well as fresh.


Reprinted by permission from StrongerTogether.coop. Find articles about your food and where it comes from, recipes and a whole lot more at www.strongertogether.coop

Chocolate Covered Frozen Bananas

Via Kara Stout

Via Kara Stout

Ingredients 

  • 4 ripe (but not brown) Equal Exchange bananas, bottoms trimmed, but unpeeled
  • 6 ounces Equal Exchange Organic Dark Chocolate, broken up (choose your favorite bar)
  • 1/4 cup cream (or vegan option= 1 tablespoon coconut oil)
  • 1/2 cup chopped topping of your choice (nuts, candied ginger, crushed cookies, coconut, etc.)

Preparation

  1. Peel bananas. Pierce each banana lengthwise with a wooden skewer freeze for at least 15 minutes, or wrap tightly in plastic or foil and freeze for up to a week.
  2. Melt the chocolate in a double boiler (or self made double boiler), a small saucepan over very low heat, or the microwave. Whisk in the cream or coconut oil and transfer the chocolate mixture to a shallow bowl. If you're using nuts, put them on a plate next to the melted chocolate.
  3. Peel the plastic / foil off bananas, dip them first in the chocolate covering the banana completely, let the chocolate drip off and cool slightly then sprinkle with toppings. Wait a few minutes and then place bananas on a piece of parchment paper in the freezer. Repeat with all of the bananas. The chocolate will cool quickly, so if necessary, reheat chocolate.
  4. Freeze bananas for 30 minutes or until chocolate is hard. You can put them in a wax- paper-lined airtight container and freeze them for longer. 

Banana chocolate pieces modification: Peel bananas, cut into 1-2 inch chunks. Follow steps 2-4, but leave pieces on wax paper in freezer until chocolate is hard, then store in an airtight container.


Reprinted by Equal Exchange.

Heirloom Tomato Gazpacho

This refreshing summer soup is a delicious way to celebrate juicy seasonal tomatoes.

Heirloom_Tomato_Gazpacho_0.jpg

Ingredients

  • 2 pounds ripe heirloom tomatoes, roughly chopped
  • 1 cucumber, seeds removed, roughly chopped
  • 1 small red onion, chopped
  • 1 green bell pepper, chopped
  • 2 tablespoons minced garlic
  • 1 jalapeño pepper, chopped
  • 1 cup cubed bread (French or rustic bread)
  • 2 tablespoons red wine vinegar
  • 2 tablespoons lime juice
  • 4 tablespoons olive oil
  • 2 tablespoons chopped fresh cilantro
  • Salt and black pepper to taste

Preparation

Combine all ingredients in a blender (in 2 to 3 batches, as everything will not fit into the blender at once). Blend until very smooth. Place in a bowl, stir the blended batches together and refrigerate for a few hours to allow the flavors to meld. Taste for salt and black pepper and serve chilled.

Serving Suggestion

A summer favorite, this Spanish soup makes a refreshing and simple lunch with a green salad and crusty bread or alongside a meze platter. You can sweeten the dish by adding some cubed fresh melon or strawberries. Gazpacho is best served slightly chilled, not ice cold.

Total Time: 1-3 hours; 20 minutes activeServings: 6

Mango & Berry Popsicles

Coconut and fresh fruit make a perfect treat for a hot day. Use any combination of fresh fruit and coconut water - we're using mango, raspberries, and blueberries. Popsicles are best using a popsicle mold and popsicle stick, however, smaller "popsicles" can be made using an ice tray.   

IMG_85581.jpg


Ingredients

  • 3 mangos (about 3 pounds), peeled, pitted and diced
  • 6 ounces raspberries 6 ounces blueberries
  • 2 cups coconut water
  • 2 tablespoons light agave nectar

Preparation

Gently push raspberries into bottom of Popsicle mold. Place diced mango into mold on top of raspberries, top with blueberries. In a liquid measuring cup, mix coconut water and agave nectar, pour into each mold, about ¼ inch from the top. Insert Popsicle sticks into each pop mold. Freeze overnight. Remove from molds and serve immediately.

Strawberry Tomato Gazpacho

This summer soup is as refreshing and flavorful as it is beautiful.

Strawberry Sweet Spicy Tomato Gazpacho

Strawberry Sweet Spicy Tomato Gazpacho

Ingredients

  • 1 pound strawberries, washed, hulled, and coarsely chopped
  • 1 pound tomatoes, coarsely chopped
  • 1 cup chopped green bell pepper
  • 1 cup chopped cucumber (peeled and seeded)
  • 1/2 cup chopped onion
  • 1 clove fresh garlic
  • 1 fresh jalapeño, seeds and stem removed
  • Zest of 1 lime
  • 4 tablespoons fresh lime juice
  • 1 1/2 tablespoons balsamic vinegar
  • 1/2 teaspoon salt

Preparation

Blend all of the ingredients together in a blender, in small batches if necessary. Stir well and taste for salt. This soup is at its refreshing best when served just under room temperature. Refrigerate the fruit and vegetables shortly before blending if you plan to serve it immediately.

Serving Suggestion

Garnish with freshly-snipped chives or a pinch of cracked black pepper.

Top 5 Affordable Steak Cuts

Meat_Your_Top_5_Affordable_Steak_Cuts.jpg

1. Chuck eye

If you want to grill a flavorful steak on a tight budget, look no further than the chuck eye. The chuck eye lives on the butcher’s edge between the chuck and the more renowned rib eye.

This cut has rich flavor and nice meat-to-fat balance similar to rib eye, but costs less. Perfect for grilling or pot roasts.

2. Flat iron steak

Versatile and untraditional, the flat iron cut (also known as “top blade”) comes from the shoulder of the cow. A trendy cut popular among food chains and upscale restaurants alike, a flat iron steak can be grilled, braised, pan fried, marinated, and everything in between. The bonus? It’s affordable. This meat – although tougher than a sirloin or fillet – has delicious flavor.

Get creative: this cut can be cooked in many ways, just be sure to not overcook it.

3. Flank steak

Skirt steak is a cut of meat from the plate – the long, flat, and flavorful bottom ribs of the cow. Flank steak is a similar cut. Both skirt and flank steak cuts can be used in a variety of dishes, most common in Colombian (think fajitas) and Asian-style stir fries. Flank steak is best when sliced across the grain before serving.

Grill, pan-fry, broil or braise for increased tenderness.

4. Tip sirloin

The sirloin is a large area cut from the rear back portion of the cow. The most prized and tender of this area is top sirloin. If you’re looking for something a little easier on the wallet, the tip sirloin is a leaner horseshoe-shaped cut ideal for cutlets, stir-fry, kebabs, and stew.

Because it’s lean, tip sirloin can be dry and chewy, so it should be marinated for a few hours before grilling, broiling or pan-searing.

5. Gunnin’ for chuck arm steak

The chuck arm comes from that larger chuck area surrounding ribs one through five. The muscles in this area get a lot of work, so the meat tends to be tough, but this makes it ideal for kebabs and stews. Also, the cuts from this area are plentiful, thus cheap! Pair with some grilled veggies for a saucy combo fit for late-night fiestas.

Perfect for braising (grilling not recommended).

How to use Halloumi

If you haven't yet tried this unusual cheese, you're in for a treat—and a fun, delicious new addition to your grilling repertoire. Halloumi has been made in Cyprus, Greece for centuries. Traditionally made from unpasteurized sheep and goat's milk, Halloumi was often wrapped with mint leaves, which was used as a preservative, and, even now the cheese is often sold with mint as a garnish. The Halloumi from Cyprus has a Protected Designation of Origin (PDO), but "Halloumi-style" cheese is now made throughout the world.

Halloumi2_0.jpg

While you can eat Halloumi raw, it's usually enjoyed cooked—not just because you can, but also because cooking improves the taste and texture. Some of the saltiness (from brining) fades as it cooks. If you find Halloumi a bit too salty for your taste, simply simmer it in water for five minutes. Then refrigerate until firm again before cooking. The texture, which starts out a bit like mozzarella, becomes a bit creamier with cooking.

Halloumi will keep in the refrigerator unopened for as long as a year. Once opened, store it in the refrigerator in salt water in an airtight container for up to two weeks, or wrap it tightly in waxed paper, parchment paper or cheese wrap. Rewrap in fresh paper whenever you unwrap it. The cheese can also be frozen for a few months. Thaw it in the refrigerator a day before you want to use it.

Find some of our favorite Halloumi serving styles below.

Grilled Halloumi

To make grilled Halloumi, simply slide the cheese onto wooden skewers that have been soaked in water first. Drizzle the cheese with olive oil and sprinkle with spices, if you like. Cook the skewered cheese just two to three minutes on each side, until it's warmed through. Large pieces of Halloumi can simply be placed directly on the grill, or you can also fry Halloumi in a skillet.

Marinated Halloumi

Marinate the cheese before cooking—in olive oil, lemon juice, garlic, red pepper, oregano or combinations of other spices, such as cumin, chili powder, ground ginger or fresh herbs like thyme, mint, basil or rosemary for extra flavor.

Cypriot-style

Cypriot-style pairs Halloumi with watermelon, or with smoked pork or lamb sausage. Use it on sandwiches (it's delicious in pita with cucumbers and tomatoes), to stuff ravioli, and over pasta, potatoes, or salads (toss the grilled cheese with any greens, and try it in place of mozzarella in a Caprese salad). Place Halloumi on kebabs with veggies. Serve it with eggs for breakfast, and on grilled burgers (meat or veggie) and eggplant. Here's a tasty recipe for Grilled Eggplant Napoleon.

Honey & Halloumi

Try drizzling the cheese with honey—which plays off the saltiness—and serving on a cheese tray. A lager makes a perfect accompaniment.

The Fruit and Veggie Grilling Guide

While most people associate outdoor grilling with burgers, hot dogs, and steaks, the grill imparts big flavors to fruits and veggies, too. A wide array of produce paired with spice rubs, marinades and sauces will keep your patio table overflowing with delicious additions to your grilling repertoire. Seasonal summer vegetables are perfect for grilling: zucchini, eggplant and bell peppers are naturally tender and become even sweeter on the grill. Slice these vegetables about 1/4-inch thick and toss them in an easy marinade for 30 minutes (or better yet, overnight) before grilling for a few minutes per side.

grilled-peaches.jpg

A simple combination of wine vinegar, olive oil, chopped garlic and herbs, and salt and pepper are all you need for a tasty marinade. This easy mix will turn grilled vegetables into Italian antipasti to serve with bread, olives, and cheese. Change the blend to vegetable oil, sesame oil, soy sauce, rice vinegar, and chopped garlic and ginger for Asian-flavored vegetables that are delicious with rice. Store-bought dressings with a vinegar base make wonderful marinades as well.

Summertime peaches, apricots, nectarines, and figs are delicious grilled. Cut fruit in half and remove any pits, then coat lightly with oil. For a sweet-savory side dish to grilled pork, chicken, or lamb, sprinkle on a little salt, pepper, and balsamic vinegar, then grill for a few minutes per side. And for dessert, dust with brown sugar, then place the halves on a clean part of the grill for a few minutes per side before serving with ice cream or pound cake (or both).

Some grilling tips:

  • Use moderate heat (not high); if it’s a charcoal grill, move the charcoal to one side and grill your fruits and veggies on the other side, over indirect heat.
  • Be sure to oil your grill thoroughly—fruits and vegetables are high in natural sugars, which means they can easily burn and stick to the grill. Before you begin cooking, clean the grill well, preheat it, and then use several layers of paper towel dipped in vegetable oil to grease it.
  • Cut vegetables into the largest possible pieces to prevent them from falling through the grill grate and avoid extra time spent flipping more pieces. For example, cut zucchini in slices along the length of the vegetable, rather than slicing into small rounds.
  • Corn doesn’t always cook through on the grill. Blanch it in boiling water for a few minutes, then grill for 5 to 10 minutes to finish cooking and add smoky flavor.


Photo credit: Mike McCune